Hello, everyone. I am praying all is well with you. And, thank you all so very-very much for the many condolences and prayers; all are so very much appreciated.
I'm hoping this post goes through as my brother's computer is old, extremely slow, and very finicky. I attempted earlier to visit some of you but it took so long to pull up your blogs it would time out. I'm pretty bored right now sitting here by myself with nothing to do but think.
I'll begin by saying, the news is that nothing physical was found that could be attributed to my nephew's heart attack.
As for me, I am in still in Philadelphia. My brother left for Fargo early Tuesday morning without me. I am here with my neice. The reason, as it happens, my brother was only made aware Monday evening my nephew was an organ donor; therefore, the hospital immediately begin removing his organs once he arrived at the hospital Sunday night-- another shocking blow!!! My brother waited until I got here to tell me. He and my nephew's mother arranged to have what was left of my nephew cremated shortly after my brother arrived there yesterday afternoon. As you can imagine they are both devastated. I know it must just double the pain my nephew had never told him (or his mother) he was a donor, and to come as a total surprise to everyone. As there will be nothing to view, there will only be a memorial on this Thursday (tomorrow); my brother will be leaving coming back here immediately after the service. As my little neice had already missed so many "snow" days out of school and because there was no chance of her having the opportunity to see and/or tell her brother good-bye, my brother decided it would be best for her not to be there while he and his ex-wife attended to the arrangements. So, here I am trying to occupy and comfort her as best I can when she comes home from school and settles down. She was fine at while at school and with her little friends yesterday, but after the day's activities were over last night, it hit her like a ton of bricks, and it was so very painful. After a rough night, I was willing to let her stay home from school today but she wanted to go. I guess it'll be the same tonight; if so, I'm praying for the strength to get through this again. My main objective was to come be supportive of my brother and as this was how he needed me, I really have no choice; but it's heartbreaking enough for an adult -- even more to watch a child trying to cope. Life has so many twists, turns and surprises; I guess we just do what we have to do. I do hate not being there to comfort my brother and my nephew's mother, and having to miss the memorial; though, fortunately, after being divorced, my brother and my nephew's mother remained good friends, so at least they have each other to get through what needed/needs to get done.
Before my brother left for North Dakota, he introduced me to a couple of his neighbors. They are so very kind; they have checked on Priscilla and me several times already, and even prepared and brought us dinner yesterday evening. Of course I'd prepared a meal for Priscilla and me, so we have something for tonight.
So, this is where things stand right now. I plan on being back home Friday evening or early Saturday morning, depending on when my brother gets in and when my flight is confirmed. If I can touch base before then I will. In the meantime, I do hope this post goes through without timing out.
I miss you and hope you're doing happy crafting!
Wednesday, February 9, 2011

Monday, February 7, 2011
EXCUSE MY ABSENCE -- DEATH IN FAMILY
To everyone, I hope all's well.
Just a quick note to let you know I'll be away for a while. My nephew, my brother's son, suffered a massive heart attack yesterday, and passed away. He is only 34 years old. He lives in Fargo, ND, and my brother lives in Phildadelphia. I am leaving for Philadelphia tonight to accompany my brother to Fargo. No preparations for arrangements will be made until my brother and I get to Fargo, therefore, I don't know when I'll be able to get back to you. But, I'll get to you when I can.
Just a quick note to let you know I'll be away for a while. My nephew, my brother's son, suffered a massive heart attack yesterday, and passed away. He is only 34 years old. He lives in Fargo, ND, and my brother lives in Phildadelphia. I am leaving for Philadelphia tonight to accompany my brother to Fargo. No preparations for arrangements will be made until my brother and I get to Fargo, therefore, I don't know when I'll be able to get back to you. But, I'll get to you when I can.
Friday, February 4, 2011
A CHALLENGE PROJECT AND ANOTHER BLOG AWARD!!!
Hello again, everyone! Well, I'm back with another challenge project. This one is something you've all probably seen before because there are different variations of it pretty much everywhere. However, I've never did one and I thought I'd like to for the Made By Momo, "Love Is In The Air" challenge.
The project is a standing candy bar pouch, and I've used a chocolate Hershey Bar with Almonds -- yum!!! As I like to name my projects I'm calling this one the "Let It Stand" Valentine Candy Bar Standing Pouch:
 Here's a picture of the stand attached to the back of the pouch and one showing the candy bar outside the pouch:


The project is a standing candy bar pouch, and I've used a chocolate Hershey Bar with Almonds -- yum!!! As I like to name my projects I'm calling this one the "Let It Stand" Valentine Candy Bar Standing Pouch:


I think it came out pretty well!
I'ld also like to say thank you to my very dear friend Linda for passing on to me this award:
As I've received this award several times (and I'm very appreciative for each and every one of those times), I hope no one will mind if I forego the rules of passing it on again. However, I will love adding Linda's name, as a show of my appreciation for this award, to the award on my sidebar. And, again, Linda , thank you so very much!
Many of you know Linda, the "ladybug" lady -- lol! -- but on the off-chance you haven't met her, please visit her blog by clicking on her name where it's highlighted above. She's such a delight!!! And while you're there you have to check out the waving grasshopper at the top right-hand side of the page -- he's just too cute and too hysterical!!!
Well, I'll be back... so,
I'll be seeing you!
A WELCOME MESSAGE TO MY NEW FOLLOWS! AND A NEW BLOG AWARD!
Happy Friday, blogging family! I hope we'll all headed towards a great crafting weekend!
I wanted to jump in and welcome all my wonderful new following families!!! I am so happy to have you and you're always welcome to come and go as you please -- you're at home! Of course, I always like to personally welcome all new followers but often Google Connect doesn't list your blogs/sites. If I have not already visited with you it's because I have not been able to find you. Therefore, please, if I may get in touch with you, leave me your blog/site address in a comment; or, you can email me at audreyfrel@sbcglobal.net. I love to keep in touch with you also!
Now I'd like to announce a brand new blog award I've received from my friend Lisa of Lisa's Craft Room. Here's the award:
 Thank you so much Lisa for this wonderful award. I very much appreciate you passing it on to me.
When you all have time, if you haven't already, please visit Lisa by clicking on her name above and show her some love.
In order to accept this award, I must pass it on. This is always such an awful decision to have to make but I've narrowed a very long list down to:
Nancy
Luvy
ScrapCrazyyy
Please visit all my friends and spread some love. Thank you!
I'll be back in a little bit with another challenge project I want to share!
I'll be seeing you!
I wanted to jump in and welcome all my wonderful new following families!!! I am so happy to have you and you're always welcome to come and go as you please -- you're at home! Of course, I always like to personally welcome all new followers but often Google Connect doesn't list your blogs/sites. If I have not already visited with you it's because I have not been able to find you. Therefore, please, if I may get in touch with you, leave me your blog/site address in a comment; or, you can email me at audreyfrel@sbcglobal.net. I love to keep in touch with you also!
Now I'd like to announce a brand new blog award I've received from my friend Lisa of Lisa's Craft Room. Here's the award:
When you all have time, if you haven't already, please visit Lisa by clicking on her name above and show her some love.
In order to accept this award, I must pass it on. This is always such an awful decision to have to make but I've narrowed a very long list down to:
Nancy
Luvy
ScrapCrazyyy
Please visit all my friends and spread some love. Thank you!
I'll be back in a little bit with another challenge project I want to share!
I'll be seeing you!
Thursday, February 3, 2011
"ISN'T IT A 'GRAND' PIANO?" DOUBLE LAYERED TREAT BOX!
Hello, everyone!!! Happy Thursday and I hope all's well. Well, I'm back over at Sheila's today with this DT project -- just in case you missed it there! I'm sure you'll like it.
I saw a picture on the internet and was so inspired by it. I'd surely love to thank the creator whoever you are! I don't know if that project was a box or not, but I knew once I saw it what mine would be and I hurriedly started figuring out how I was going to do it. As I accidently published this yesterday evening before it was time and had to quickly remove it, I'm certain some of you have already gotten a "sneak" peek of it... well, now you get to see it in all it's grandeur!!! I haven't had the time to do a cut.file for this project yet, so relax and get ready for me to show you how I did it by hand. The procedures are really easy but the step-by-step tutorial is rather lengthy, so let's get started. Here's the box and you'll see at the end of the tutorial it's really a double box which will hold 2 treats:


How cute is this?!!! I really hope you like it!!!
I'll be seeing you!
http://www.4shared.com/document/O2ySIMEH/piano_box_lid.html
I saw a picture on the internet and was so inspired by it. I'd surely love to thank the creator whoever you are! I don't know if that project was a box or not, but I knew once I saw it what mine would be and I hurriedly started figuring out how I was going to do it. As I accidently published this yesterday evening before it was time and had to quickly remove it, I'm certain some of you have already gotten a "sneak" peek of it... well, now you get to see it in all it's grandeur!!! I haven't had the time to do a cut.file for this project yet, so relax and get ready for me to show you how I did it by hand. The procedures are really easy but the step-by-step tutorial is rather lengthy, so let's get started. Here's the box and you'll see at the end of the tutorial it's really a double box which will hold 2 treats:

I started by assembling all the pieces I would need. The first being the 2 boxes which form the Body of the piano box. I measured and cut the 2 bases and 2 lids from black cardstock as follows:
Wide box base paper size = 8.50" x 7"
Wide box lid paper size = 7 1/8" x 6 1/8"
Narrow box base paper size = 8" x 5"
Narrowr box lid paper size = 7 1/8" x 4 1/8"
I scored each base 1" on all 4 sides and scored each lid 1/2" on all 4 sides. This is what I had:

I snipped between the middle of each box corner, up to the intersecting corner score line, to form the fold tabs for the boxes:

After doing this on all the box corners of both bases and lids, I cut away the inside tabs from each corner fold tab, leaving only the outside tabs:

Once all the inside box corner tabs were cut out on both bases and lids, I bonefolded along all the score lines:

I glued tabs inside the folds of the bases and the lids to form my 2 boxes. I put these boxes to the side to move on to the next procedure, which is the Keyboard:
Keyboard paper size = 6.25" x 3" (white cardstock paper).
After measuring and cutting out paper size for the keyboard, I scored it at 1/2" intervals across the 6.25" top side of the paper with a black pen (you can also use a black felt narrow tip marker). The black scoring lines form the White Piano Keys. It looked like this:

Next, I did the Black Piano Keys by measuring out a strip of black cardstock at 1/2" x 8 1/2". I folded the strip in half lenthwise and then in half again. I now have 4 equal sections:

I cut and separate each section, and fold each of the individual sections in half again:

I next cut each of these folded sections apart to give me the 8 black piana keys needed. I put these aside and continued on to the next steps.
NOTE: Please read carefully from here on to avoid using the box base for the box lid and/or vice-versa; I've underscored the box parts to help clarify you don't mistake them. Okay, I'm going to grab the wide box lid and the white cardstock paper keyboard. I glue the white keyboard cardstock to the top of this wide box lid close to and along one edge of the lid (lengthwise) to look like this:
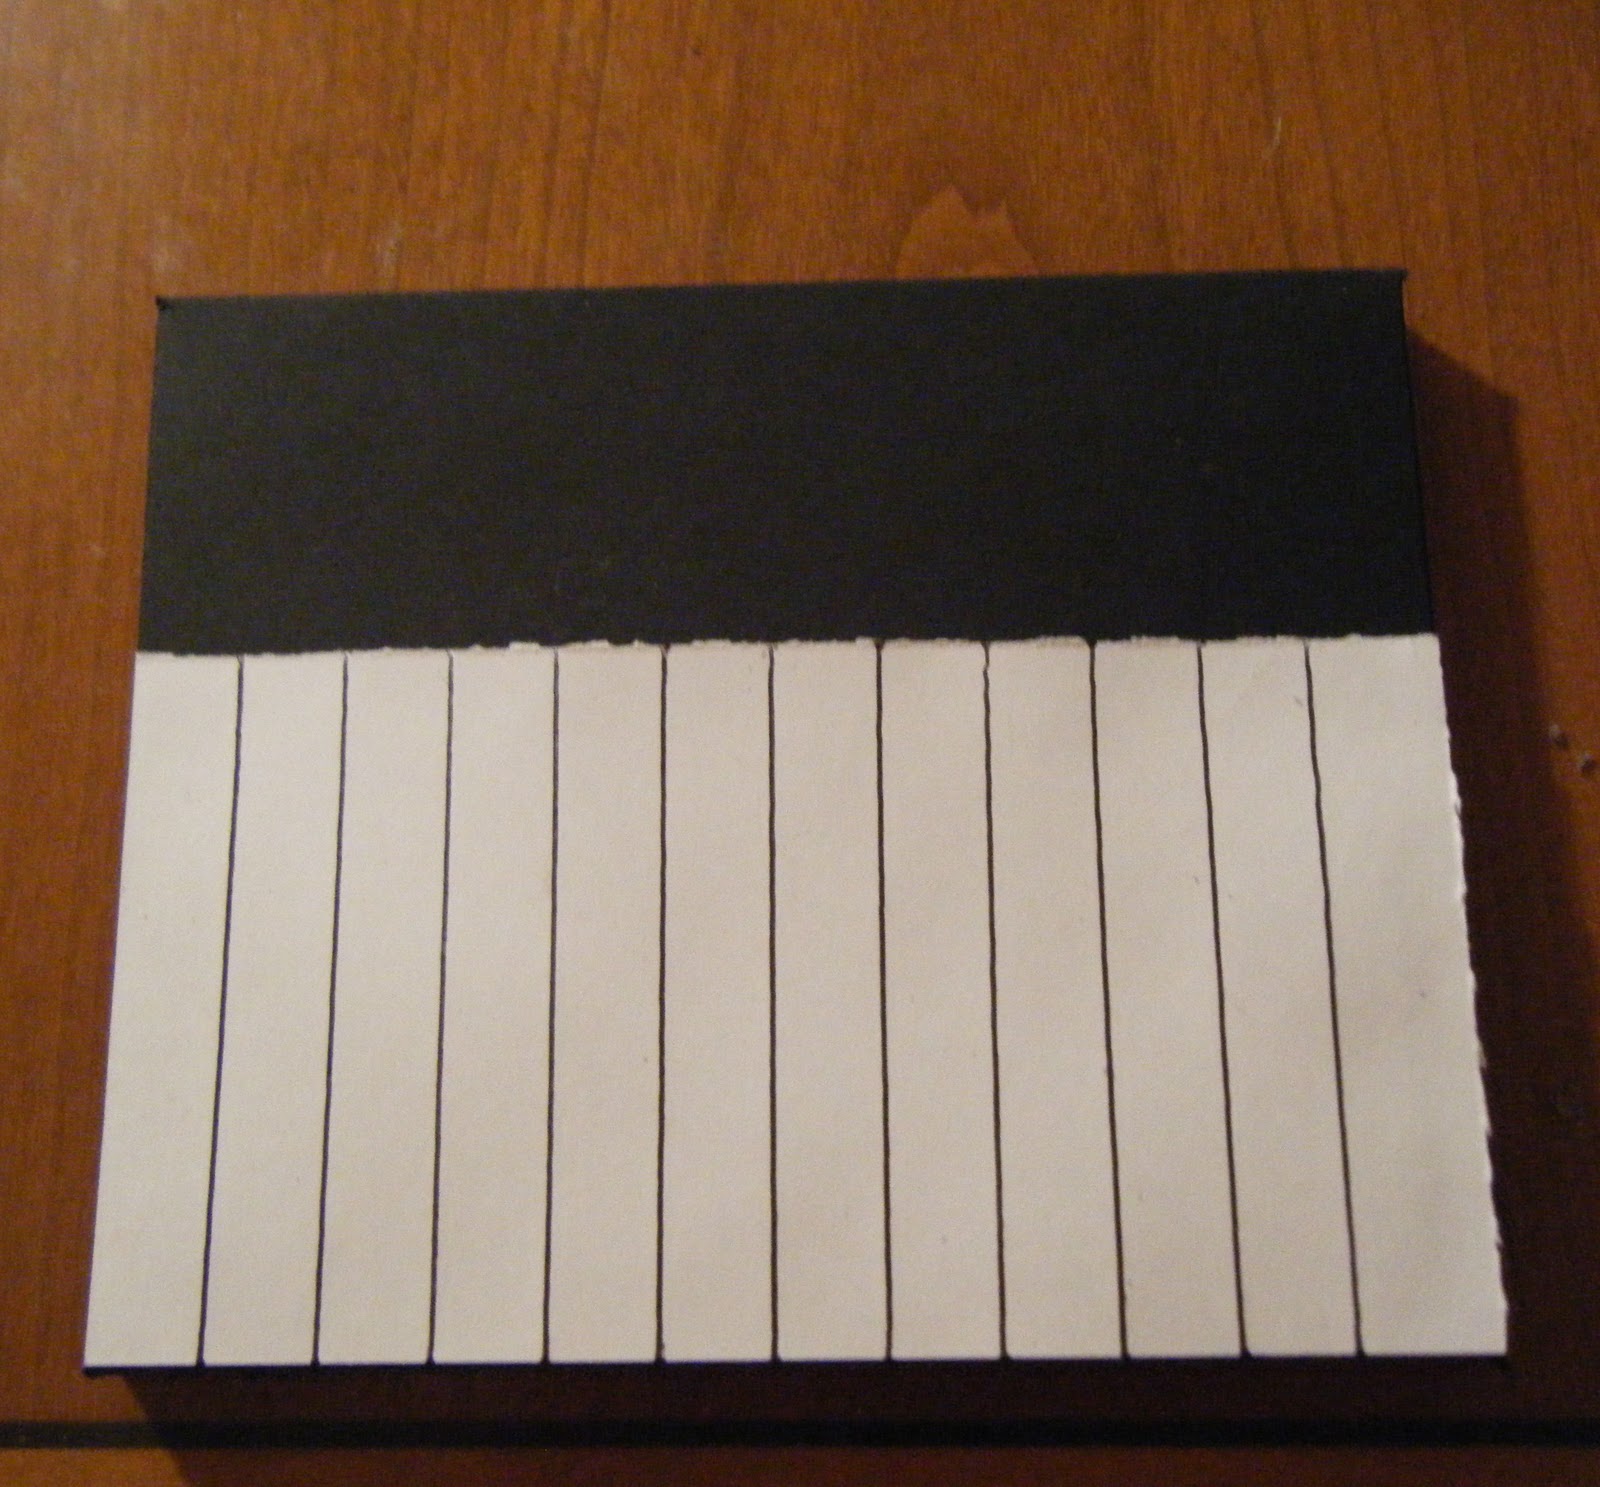
Next I grab the Narrow box base and glue it along the back of the Wide box lid; it'll look like this:

Now, I'm going to take my 8 black keys and glue them as evenly as possible, aligning them up against the front of the Narrow box lid and to the middle of each black scoreline on the white keyboard cardstock; alternating them by using 2 black keys then skipping a black line and next using 3 black keys and skipping a black scoreline until it looks like this:

Phew! I'm almost there! Now I'll make the Legs for the piano box! I took 2 toilet tissue rolls and cut each roll evenly in half to form 4 rolls. As I only use 3 of the rolls, I discarded one section. I then covered the 3 remaining sections with black cardstock; like this:

Now I'll glue the legs onto the bottom of the piano base, which is the Wide box base, by gluing one leg onto each front corner and the last leg to the middle back section of the box base. It'll look like this:

All right!!! The last procedure to making this box, before decorating it, is to add the piano lid. (if you'd like to have a copy to print out, I have a .PDF file available of this lid at the end of this post). Okay, finally all I had to do was cut out the lid and glue the straight edge of the lid to the top of the smaller box lid aligned with and along the front edge of the Narrow box lid. See the pictures below for examples:


Now add the lids to their box bases and our double treat box is done! See, all it really is is gluing 2 boxes together -- a narrower one of top of a wider one. Now it's time to decorate! I traded out the black lid for the white one on my completed box and stamped it with the sentiment "all you need is love". The music notes and the word "Love" are stickers. Lastly I added a sticker heart to some small paper flowers from a small bunch I bought at Michaels for 99 cents and glued them to the lid, and up one of the legs on the front of the box; added a black velvet bow to the roses and all done! Now, you can design your own! Oh, and don't forget to let me see it when you do!
Here is a picture of the box open to display the inside of the narrow compartment treat box ( I used a popsicle stick to prop it open):

Here's a picture of both boxes open to reveal both treat box (narrow and wide) compartments:

How cute is this?!!! I really hope you like it!!!
I'll be seeing you!
http://www.4shared.com/document/O2ySIMEH/piano_box_lid.html
Wednesday, February 2, 2011
A CUP OF CHOCOLATE LOVE -- IT'S SO "GIRLY"!!!
Happy Wednesday, everyone!!! I hope everyone is doing well and not having to enjoy the "exuberant" weather we're experiencing here in Chicago! We won't even talk about it right now -- way too overwhelming and exhausting! LOL!
What I will talk about are my NEW FOLLOWERS!!! I love it!!! My friends, I am so glad to have you here! Of course you'll always be welcome so prepare to stay awhile! I consider you members of my blogging family now, so come and go as you like, but do come often.
Moving right along, I'm telling you guys, I'm reeaaaally on a roll! I have another challenge project that I put together especially for the "Girly" challenge over at Top Tip Tuesday. And, thanks to Rose, I have also enter this card into the Simply Create Challenge also.
This is a cup of chocolate love for sure -- (Snickers bars) -- and a standing framed card:

What I will talk about are my NEW FOLLOWERS!!! I love it!!! My friends, I am so glad to have you here! Of course you'll always be welcome so prepare to stay awhile! I consider you members of my blogging family now, so come and go as you like, but do come often.
Moving right along, I'm telling you guys, I'm reeaaaally on a roll! I have another challenge project that I put together especially for the "Girly" challenge over at Top Tip Tuesday. And, thanks to Rose, I have also enter this card into the Simply Create Challenge also.
This is a cup of chocolate love for sure -- (Snickers bars) -- and a standing framed card:

The card reads, "Good times are even better when they are shared with friends". Now there's a girly statement for a girly gift!!!
This is sort of a recycled project because I used an old cake topper for the frame by breaking it apart and using only the parts I wanted. The little hearts on the cup came off the cake topper and I used them on the cup to match the framed card. I stuck the framed card from the cake topper into a piece of styrofoam and covered the styrofoam with matching paper and ribbon. This was such a fun project!
Before I get away, I'd like to remind you to please join me tomorrow over at Sheila's for my DT project. I have a project I just know you'll love -- it's really something!!!
Gotta go!!! Hope you like my Cup of Chocolate Love!
Tuesday, February 1, 2011
I'M ON A ROLL -- ANOTHER CARD FOR CHALLENGES!!!
Happy Tuesday, everyone!!! Hope all's well!
I'm in a hurry to get this posted because as you may have heard we are in for a severe snow blizzard here, and I've already encountered some minor interference internet problems related to snow on the trees and wires.
This card I made specifically to fit the requirements of two (2) challenges: Craft Your Passion and The Cuttlebug Spot.
For this card I welded 3of the label images from the Story Book cart to create the tri-fold card, the word "Love" is from the Love Struck cart, and the hearts are from the Plantin cart. I don't know the name of the folder, but I used Cuttlebug and a Cuttlebug folder for all the embossing. To embellish, I added Rhinestones and Stickles for the bling.
Here's my card:


Can you believe this is me -- actually doing all these challenges?!!! Gotta keep those resolutions for the new year! LOL!!!
Well, that's it for now. I'll be back with more stuff!!!
I'm in a hurry to get this posted because as you may have heard we are in for a severe snow blizzard here, and I've already encountered some minor interference internet problems related to snow on the trees and wires.
This card I made specifically to fit the requirements of two (2) challenges: Craft Your Passion and The Cuttlebug Spot.

For this card I welded 3of the label images from the Story Book cart to create the tri-fold card, the word "Love" is from the Love Struck cart, and the hearts are from the Plantin cart. I don't know the name of the folder, but I used Cuttlebug and a Cuttlebug folder for all the embossing. To embellish, I added Rhinestones and Stickles for the bling.
Here's my card:
Here are a few close-ups:


Well, that's it for now. I'll be back with more stuff!!!
Subscribe to:
Posts (Atom)